Home
Repair And Restoration
CBF 125 Tappets - Brief Guide
By Ren Withnell
According to my Haynes manual the tappets on the CBF 125 need to be done at every service, every 2,500 miles. When the engine is new and bedding in I think this is a very prudent thing to do. As everything settles in it is likely the tappets will actually tighten not slacken. This can lead to poor tickover and ultimately the risk of burning out a valve. That said since around 10,000 miles I've been doing the tappets a lot lot less frequently as I've found they stay in tolerance extremely well once everything has run in.
Step One
According to Haynes you need to remove the lower fairing panels, side panels and tank. I find it a lot simpler to remove the left hand side lower fairing and the left hand side panel. I still have sufficient access to comfortably work on the cylinder head.
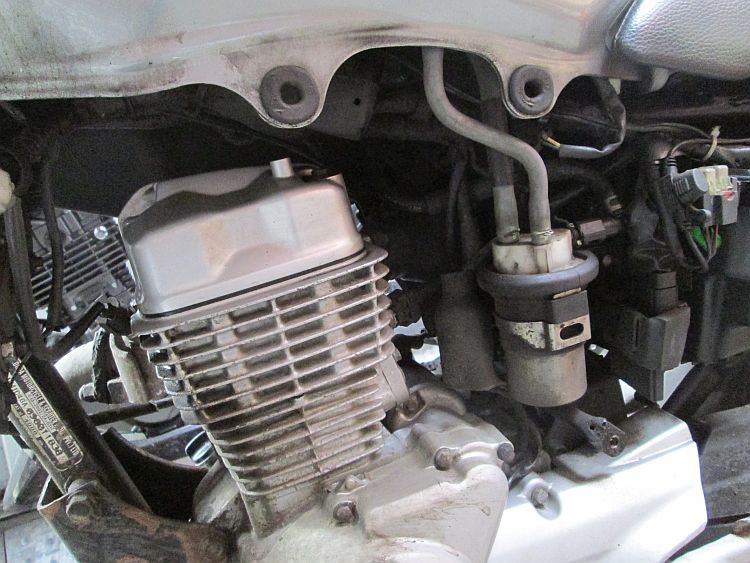
Access is good once the fairing and side panel are removed.
Step Two
Remove the rocker cover. 2 10mm bolts on opposite corners then carefully lift the rocker cover off, forwards and out on the right side, the exhaust side. Look out for the rubber gasket around the base of the rocker.
The rocker cover can be wriggled out forwards over the exhaust pipe.
Step Three
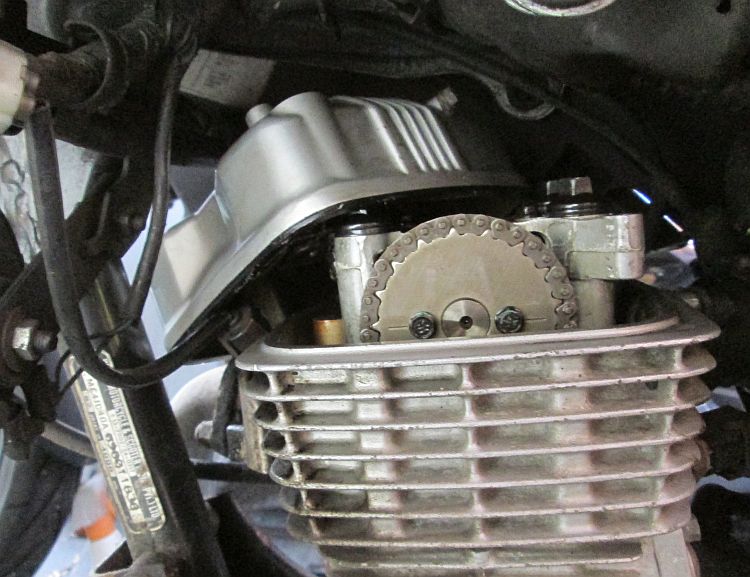
Top Dead Centre. Again according to Haynes you need to remove the inspection covers on the left side of the engine. Nope. Moving the rear wheel to allow gear engagement hook the gears up into 5th gear. Rotating the rear wheel carefully and ALWAYS in the direction of drive (ie forwards) you can nudge the engine over. Note on the camshaft gear are 2 lines, timing marks. These need to be flat, horizontal, in line with the edge of the cylinder head.
BUT...the camshaft needs to be the right way up! Rattle the tappets. If they are tight rotate the rear wheel slowly in the direction of drive and you'll see the exhaust valve open and close. Rotate until the lines are in line with the cylinder head again.This is where you check the tappets. CHECK! Rotate some more the inlet opens, lines go flat, exhaust opens, lines go flat. You want the lines to line up when neither of the valves are about to open or close.
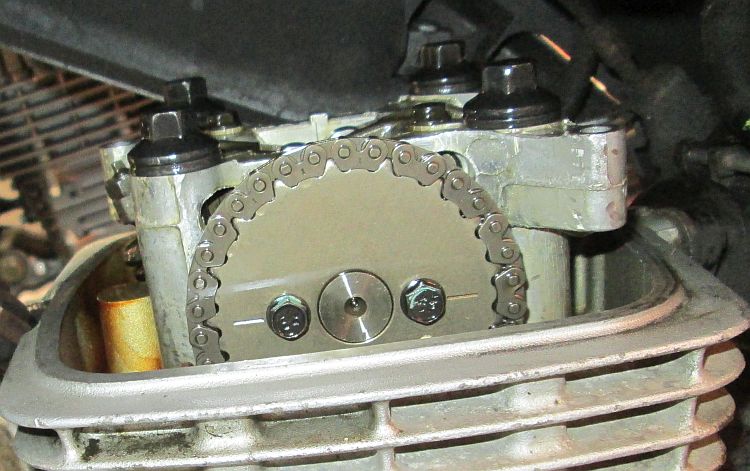
The timing marks should align flat with the top of the cylinder head.
Step Four
Adjust. Note when checking the camshaft is the right way up it is possible that the exhaust valve in particular may be tight even with the camshaft in the correct position. I used to think valves went slack over time, nope, they often get tighter. This is in fact worse than loose as tight valves can cause burnt or bent valves which gets expensive. This is why they need checking!
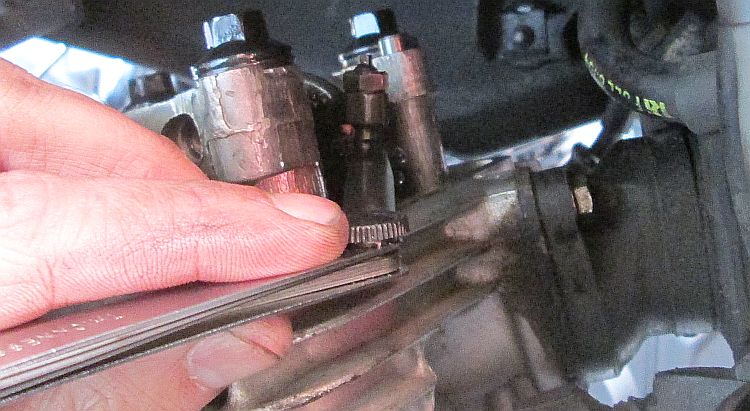
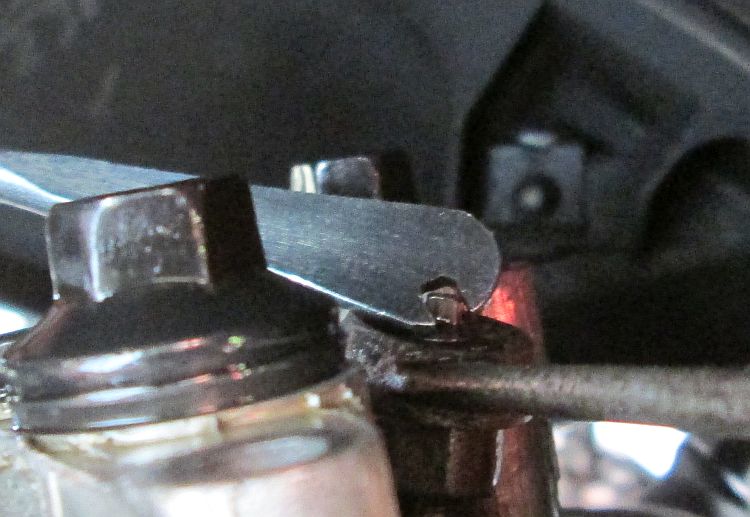
The valve is adjusted by screwing in or out the bolt that touches the top of the valve. It is held in place with a 10mm nut, no problems there. BUT the bolt has a tiny teeny square peg on the top to turn the bolt. You can buy a tool for a couple of quid, you can make your own tool like I did or you can use pliers. The tool is the easiest bet, my tool works sort of OK, the pliers makes the job as fiddly as hell but still manageable.
Undoing, turning the square peg, tightening and checking is fiddly. Make a brew, get yourself comfy, have a smoke and settle in, being ready to be patient. Experienced mechanics might have the knack but I've done it several times and it's a drawn out affair. The inlet valve, near the injector, should be 0.08mm +- 0.02, the exhaust valve near the exhaust should be 0.12mm +- 0.02. Feeler in, too wide, undo, turn the square peg a tiny bit, tighten, check, too tight, undo, turn peg, tighten, check, still too tight, undo, adjust, tighten, check, too loose. And so on and so on and so on. Be patient, you will get there.

The parts you need to fettle to set the tappets.
Feeler guages - you should feel the metal is gripped but not tight in the gap
Step Five
Double Check. Rotate the rear again, past the valves opening and closing and line the lines up again. Check. If it's still not right carry on! Your patience will be rewarded with a nice warm feeling that you've done the job properly, thoroughly and well. Ensure the 10mm bolts are nipped up (not toooooo tight!) when the feeler gauges are gripped but not tight when passed between the top of the valve and the tip of the adjusting bolt.
Check and double check.
Step Six
Put everything back together. Be careful when putting the rocker cover back on as the rubber gasket can get twisted. Make sure it's flat, fitted and square all around before you replace and tighten the rocker cover bolts. Strictly speaking the gasket should be replaced each time. Yeah...right. If you get a leak get a new gasket. That said mine's 30,000 miles old, leaks a bit but it never worries me. If it's leaking I know there's oil in there...
Before you put all the panels back on start the bike up. Check the engine, does it run right? Does it sound right? Before you ride the bike take a moment to make sure you've tightened everything back up (not toooooo tight!).
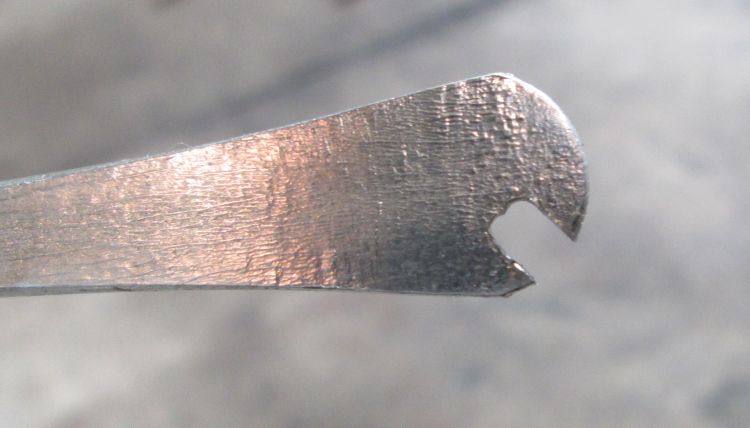
My DIY Tappet tool. I apllied an tiny file to an old bicycle tyre lever
Reader's Comments
John said :-
That's a great how to there. Thanks. Worth mentioning that while you usually change your oil with the motor warm, it must be cold to check valves.
01/01/2000 00:00:00 UTC
Ren - The Ed said :-
AHA! Fair point John. Usually it's best to leave the bike overnight to make sure it's fully cold.
I often wonder though just how much temperature affects the measurement. I mean, 0.02mm is like a super duper thin tolerance. If I checked the bike on a warm summer's morning then again on a cold winter morning, how much difference would there be?
01/01/2000 00:00:00 UTC
Chris Bell said :-
Since I do my own cg tappets, I realize they have to be checked with a cold engine, apparently, as pointed out.So it's an interesting thought that none of my bikes that were taken to the main dealer(years ago), were ever left over night,including a CBX 1000, 24 valves, makes me wonder, 21 shims needed changing once, hmm .Great little how to.
15/05/2016 16:44:18 UTC
Ren - The Ed said :-
I would not feel at all comfortable if a shop or garage "did" my tappets in a few hours. Last time the gf's bike had a tappet check the shop insisted the bike stay with them overnight. While it is a pain in the backside to leave the bike at least I felt a little more confidence that the tappets would be done correctly.
I find it hard to trust some shops. It is very easy for a garage to claim the tappets have been adjusted or shimmed because very few people will make the effort to check for themselves. It is also very hard to prove that any damage done to the engine later on was due to a lack of tappet adjustment.
Doing it yourself if possible is the way to go. Otherwise you're going to have to really trust the mechanic you get to do it for you.
16/05/2016 17:22:23 UTC
Bassel said :-
thank you mate for the detailed how to, I thought I need to buy a work shop manual to get this right.
10/06/2018 02:39:40 UTC
Ren - The Ed said :-
Cheers Bassel. Just be sure to take your time and get it right. Patience and plenty of cups of tea. I've done the tappets many times now, the more you do it the easier it gets.
10/06/2018 07:53:40 UTC
Martin said :-
If you're a cyclist, I found I had a spoke nipple tool which fitted the tappet perfectly
Brilliant post/guide, thank you
08/03/2019 13:38:57 UTC
Ren - The Ed said :-
Ya know what Martin... that is a fabulous idea! Good call than man, well done.
08/03/2019 15:28:38 UTC
Danny mac said :-
Hi tried to remove valve cover but didn't seem to have enough clearance to lift clear off ! ( did not remove tank,but shouldn't make a difference) !
04/10/2020 13:15:40 UTC
Ren - The Ed¹ said :-
Removing the cover is fiddly. There's a clump of wires that get in the way and these will need to be pushed up just a little. I have found the best direction is to take the cover outwards over the exhaust pipe. Keep on fiddling Danny.
05/10/2020 09:00:45 UTC
said :-
13/07/2021 14:09:58 UTC
Phil said :-
Hi having trouble since replacing barrel and piston on cbf 125 put all together great compresion but spark gone intermitent sparks great then goes off then sparks again timing issue ?
29/01/2022 07:59:23 UTC
Ren - The Ed¹ said :-
Typically in my experience the timing is unlikely to be the problem. The timing is set by the computer and the pickup/sensor on the flywheel.
I'd start by looking at the wiring. Ensure the key switch is working properly as this was an issue on earlier Hondas. Ensure good connection between the pickup and the computer then the computer to the coil and the coil through the spark plug lead and the spark plug cap. Check the pickup on the from the flywheel isn't loose.
31/01/2022 10:39:36 UTC
said :-
10/02/2024 01:27:03 UTC
Name
Comment
Add a RELEVANT link (not required)
Upload an image (not required) -
Uploading...
Home
Repair And Restoration